 |
|
|
#1 |
|
S4 - Getting the hang of it
Join Date: May 2009
Location: UK
Posts: 189
Casino cash: $4347  |
Is it quite easy to get the front bumper off and on ? Thinking it maybe easier to take it off and get it painted than leave the car there for a few days.
How much are you looking at paying for a respray ? Any issues painting carbon fibre ? Rick |
|
|

|
|
|
#2 |
|
CSL Register Uber-poster!
  Join Date: Apr 2008
Location: Uk
Posts: 14,646
Casino cash: $43909  |
havent done it yet for myself but was advosed pretty easy but you need a 14mm Torq bit with long extension
 for the big two bolts for the big two bolts
__________________
. |
|
|

|
|
|
#3 |
|
CSL Register Uber-poster!
 |
Tom will tell ya !!

|
|
|

|
|
|
#4 |
|
S5, Sport On, DSC M-track
Join Date: Jun 2008
Location: Auckland, New Zealand
Posts: 1,434
Casino cash: $13579  |
LOL ... You must be psychic!!
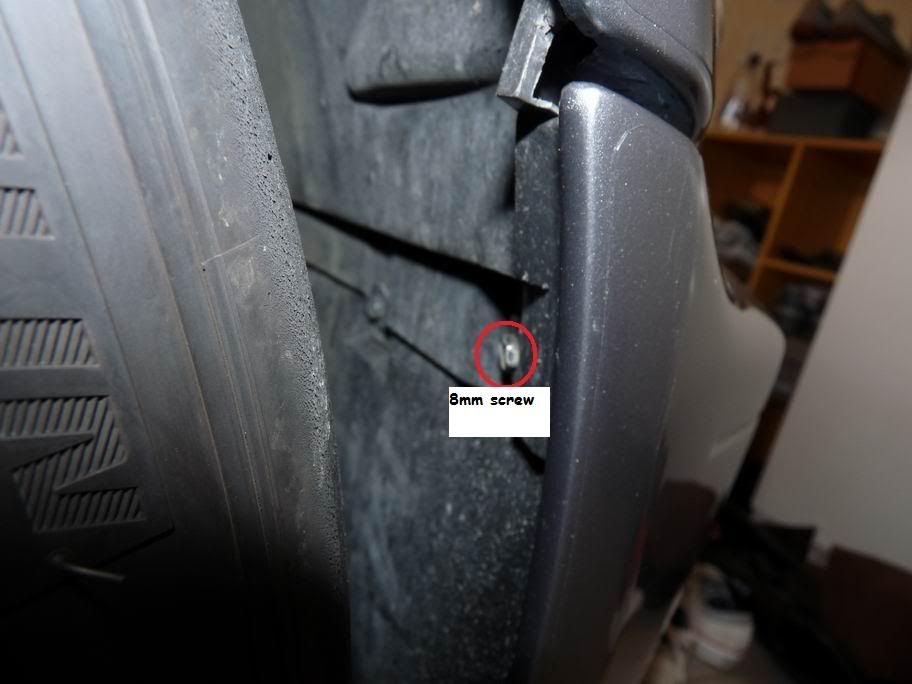
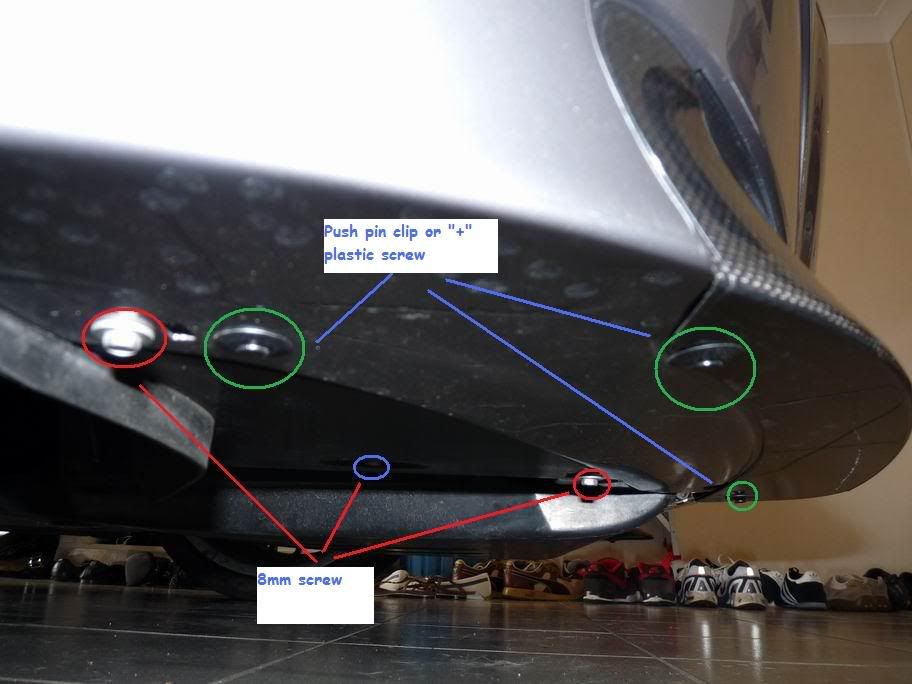
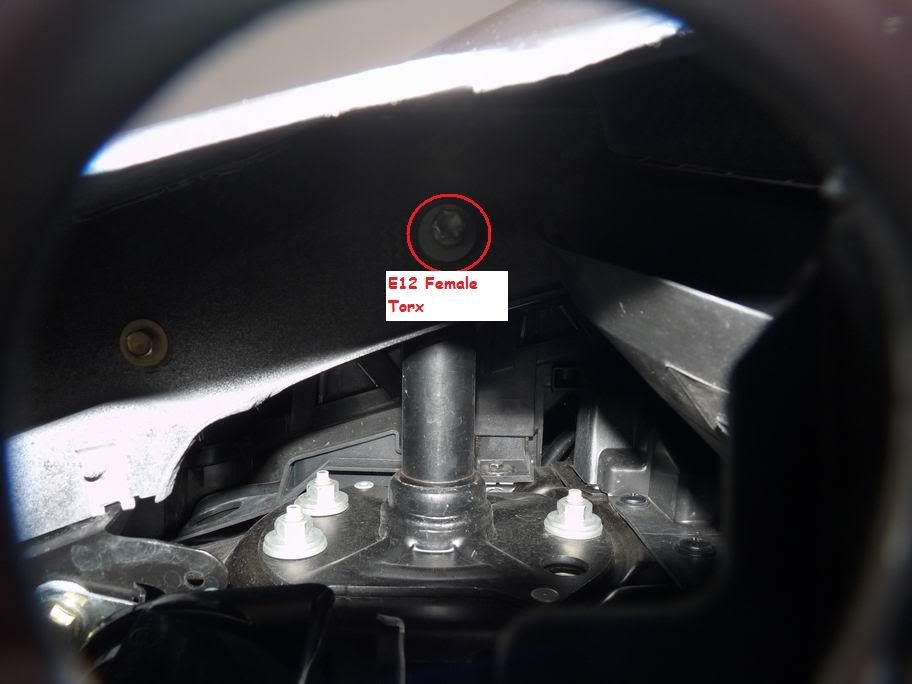
It's easy if you've done it before .. but if you haven't then it can be a little tricky - best to have a friend to help. Below is a rough guide. I am going to remove mine soon and put the replica on for the track day, so I might snap some photos and update this later on  1. Lift the front end on stands or ramp (optional, but can make it slightly easier to remove - especially when you need to remove the long torx bolts) 2. Remove the carbon splitters (2 pop clip for each splitter, or 4 if you have the later model splitter design - circled in green below) - pull the centre of the pin out and the remainder of the clip will pull out - use a wedge tool if you can't. When removing the splitter remove from the outside edge first, then twist downwards to remove the inner side (hard to describe, but start from the outside you'll soon see what I mean). 3. Remove a host of 8mm screws from the wheel well and under the bumper (1 x each wheel well - the outter most one)  and (2x each side under the bumper = total 4 (circled red)). Then there's one more that holds the bottom of the windscreen wiper bottle (circled blue) making this the fifth 8mm screw under the bumper - all the ones under the bumper should be silver in colour - the ones in the wheel well are black = total 8mm screws is 7.  4. Remove the plastic clip under the bumper - 1 x each side - some have a pop in style clip, some are a normal "+" plastic screw. (circled in green above) 5. If you look from the bottom of the bumper you'll notice 2 holes on each side just under the splitter hole - these are guide holes for removing the Long Torx bolts that hold the bumper to the crash shocks that are bolted to the chassis. You will need a torx socket to remove these long bolts and a good extension (E12 female torx socket) - there's 2 torx bolts (circled in red below) - remove these and you are ready to pull the bumper off.  6. Get a friend and lay a big sheet or tower on the floor to avoid damaging the bumper (best to also put some masking tape on the bumper edges to prevent paint damage). 7. As you still have to disconnet quite a few things before the bumper will come free, you want to pull the bumper forward slowly. You'll need to disconnect the following: - washer bottle pump wire (down the bottom of washer bottle); - washer bottle drain line (black rubber line at the bottome of washer bottle) - washer bottle fill line (big white plastic tube - easiest way to remove this is to remove the driver side turn signal and pull this out before you remove the bumper) - lower intake tube - the long foam tube - this is self explanatory when you've pulled the bumper 50% off - Outside temp sensor (this is on the passenger side and connected to the bumper itself = there's a push button on the plug to pull it free from the bumper holder) 8. Note - once you disconnet the washer bottle drain line, washer fluids will leak out continuously ... so best to drain this as much as you can before you remove the bumper 9. Pull forward with your mate, or if you are on your own, use your all fours to prop the bumper up haha ... it works trust me .. You are done. I'll update this with photos later! Last edited by NZ_M3; 25-02-2010 at 06:00 AM. |
|
|

|
|
|
#5 |
|
S4 - Getting the hang of it
Join Date: May 2009
Location: UK
Posts: 189
Casino cash: $4347  |
Wow - that's brilliant mate, looks easy enough.
Thanks |
|
|

|
|
|
#6 |
|
CSL Register Uber-poster!
  Join Date: Apr 2008
Location: Uk
Posts: 14,646
Casino cash: $43909  |
no idea where i saved this from!
   
__________________
. |
|
|

|
|
|
#7 |
|
S6, Sport On, Traction Off
Join Date: Feb 2012
Location: Somerset
Posts: 1,577
Casino cash: $4530  |
Thanks guys! Just removed my bumper for a new coat of paint & clear wrap, bloody stone chips & this thread was a huge help

|
|
|

|
 |
| Tags |
| csl bumper |
|
|